[Android] 데이터베이스(Database)와 내용 제공자(Content Provider)
모든 내용은 Do it! 안드로이드 앱 프로그래밍을 바탕으로 정리한 것입니다.
내용 제공자(Content Provider)
: 앱에서 관리하는 데이터를 다른 앱에서 접근하도록 돕는 것
- 앱 구성요소이므로 시스템에서 관리하며 Manifest 파일에 등록해야 사용 가능함
- 내용 제공자가 필요한 이유? 앱의 보안
- 각 앱은 자신의 프로세스와 권한 안에서만 데이터에 접근할 수 있음
- A 앱과 B 앱은 각각 독립된 프로세스를 가지며, A는 A의 데이터를 B는 B의 데이터만 사용해야 함
- 가끔 서로 다른 앱의 데이터에 접근해야 할 때 내용 제공자를 사용하는 것
⭐ 내용 제공자의 동작은 CRUD 동작을 기준으로 함
CRUD : Create(생성), Read(조회), Update(수정), Delete(삭제)
→ 내용제공자는 insert(), query(), update(), delete() 메서드를 지원함
⭐ 내용 제공자를 사용하면 다른 앱에게 데이터 접근 통로를 열어줄 수 있음
👆 반드시 허용된 통로로만 접근해야 함!
→ 해당 통로로 접근하기 위해서 콘텐트 리졸버(ContentResolver) 객체가 필요함
[ 예제 ]
DatabaseHelper.java
- SQLiteOpenHelper 클래스 상속
- 생성자에서 person.db 파일(데이터 베이스)를 생성함
- onCreate() 메서드 안에서 execSQL() 메서드를 이용하여 person 테이블을 생성함
public class DatabaseHelper extends SQLiteOpenHelper {
    private static final String DATABASE_NAME = "person.db";
    private static final int DATABASE_VERSION = 1;

    public static final String TABLE_NAME = "person";
    public static final String PERSON_ID = "_id";
    public static final String PERSON_NAME = "name";
    public static final String PERSON_AGE = "age";
    public static final String PERSON_MOBILE = "mobile";

    public static final String[] ALL_COLUMNS = {PERSON_ID, PERSON_NAME, PERSON_AGE, PERSON_MOBILE};

    // 테이블 생성 쿼리문
    private static final String CREATE_TABLE =
            "CREATE TABLE " + TABLE_NAME + " (" +
                    PERSON_ID + " INTEGER PRIMARY KEY AUTOINCREMENT, " +
                    PERSON_NAME + " TEXT, " +
                    PERSON_AGE + " INTEGER, " +
                    PERSON_MOBILE + " TEXT" +
                    ");";

    public DatabaseHelper(Context context) {
        super(context, DATABASE_NAME, null, DATABASE_VERSION);
    }

    @Override
    public void onCreate(SQLiteDatabase sqLiteDatabase) {
        sqLiteDatabase.execSQL(CREATE_TABLE);
    }

    @Override
    public void onUpgrade(SQLiteDatabase sqLiteDatabase, int oldVer, int newVer) {
        sqLiteDatabase.execSQL("DROP TABLE IF EXISTS " + TABLE_NAME);
        onCreate(sqLiteDatabase);
    }
}
PersonProvider.java
public class PersonProvider extends ContentProvider {

    private static final String AUTHORITY = "com.june.providertest";
    private static final String BASE_PATH = "person";
    public static final Uri CONTENT_URI = Uri.parse("content://" + AUTHORITY + "/" + BASE_PATH);

    private static final int PERSONS = 1;
    private static final int PERSON_ID = 2;

    private static final UriMatcher uriMatcher = new UriMatcher(UriMatcher.NO_MATCH);
    static {
        uriMatcher.addURI(AUTHORITY, BASE_PATH, PERSONS);
        uriMatcher.addURI(AUTHORITY, BASE_PATH + "/#", PERSON_ID);
    }

    private SQLiteDatabase database;

    @Override
    public boolean onCreate() {
        // 헬퍼 클래스로 데이터베이스 생성
        DatabaseHelper helper = new DatabaseHelper(getContext());
        database = helper.getWritableDatabase();

        return true;
}- 내용 제공자를 만들기 위해 고유한 값을 가진 content URI가 필요함
- 예제에서는 앱의 패키지명과 person 테이블명을 합쳐 만들었음 (content://com.june.providertest/person/1)
- content:// - 내용 제공자에 의해 제어되는 데이터라는 의미
- Authority - 패키지명으로 지정한 부분을 가리키며 특정 내용 제공자를 구분하는 고유값
- BasePath - 테이블명으로 지정한 부분 가리키며 요청할 데이터의 자료형을 결정 (여기에선 테이블 명)
- ID - 맨 뒤에 1로 지정한 부분을 가리키며 요청할 데이터 레코드를 지정
- UriMatcher 객체 : URI를 매칭하는 역할
- addURI() 메서드 : UriMatcher 객체에 URI를 추가함
- match() 메서드를 호출하여 UriMatcher에 추가된 URI 중 실행 가능한 것이 있는지 확인
- ContentResolver 객체 : 내용 제공자에 접근하는 역할
- 액티비티에서 getContentResolver() 메서드를 호출하면 ConentResolver 객체를 반환함
- 이 객체에 insert(), query(), update(), delete() 등의 메서드가 정의되어 있음
- notifyChange() 메서드 : 레코드의 변경이 일어났음을 알려주는 역할
    @Nullable
    @Override
    public String getType(@NonNull Uri uri) {
        switch (uriMatcher.match(uri)) {
            case PERSONS:
                return "vnd.android.cursor.dir/persons";
            default:
                throw new IllegalArgumentException("알 수 없는 URI " + uri);
        }
    }
getType() 메서드 : MIME 타입이 무엇인지 알고 싶을 때 사용
- Uri 객체가 전달되며 결과 값으로 MIME 타입이 반환됨
- MIME 타입을 알 수 없는 경우 null을 반환함
@Nullable
    @Override
    public Uri insert(@NonNull Uri uri, @Nullable ContentValues contentValues) {
        // 삽입된 새로운 레코드의 id값 반환
        long id = database.insert(DatabaseHelper.TABLE_NAME, null, contentValues);

        if (id > 0) {
            Uri _uri = ContentUris.withAppendedId(CONTENT_URI, id);  // 새로운 레코드의 uri
            getContext().getContentResolver().notifyChange(_uri, null);
            return _uri;
        }

        throw new SQLException("추가 실패 -> URI : " + uri);
    }
insert() 메서드 : 내용 제공자를 이용하여 데이터를 추가할 때 사용
- 첫 번째 파라미터(uri)
- 두 번째 파라미터(contentValues) : 저장한 칼럼명과 값들이 들어간 ContentValues 객체
- 결과 값 : 새로 추가된 Uri 정보 반환
    @Nullable
    @Override
    public Cursor query(@NonNull Uri uri, @Nullable String[] strings, @Nullable String s, @Nullable String[] strings1, @Nullable String s1) {
        Cursor cursor;
        switch (uriMatcher.match(uri)) {
            case PERSONS:
                cursor = database.query(DatabaseHelper.TABLE_NAME, DatabaseHelper.ALL_COLUMNS, s, null, null, null,
                        DatabaseHelper.PERSON_NAME + " ASC");
                break;
            default:
                throw new IllegalArgumentException("알 수 없는 URI " + uri);
        }
        cursor.setNotificationUri(getContext().getContentResolver(), uri);

        return cursor;
    }
query() 메서드 : 내용 제공자를 이용하여 값을 조회하고 싶을 때 사용
- 첫 번째 파라미터(uri)
- 두 번째 파라미터(String[] strings) : 어떤 칼럼들을 조회할 것인지 지정 (null인 경우 모든 칼럼 조회)
- 세 번째 파라미터(String s) : SQL의 where 절 조건 (null인 경우 where 절이 없는 것과 동일)
- 네 번째 파라미터(String[] strings1) : 세 번째 파라미터에 값이 있을 경우 그 안에 들어갈 조건 값을 대체하기 위해 사용
- 다섯 번째 파라미터(String s1) : 정렬 칼럼을 지정 (null인 경우 정렬X)
    @Override
    public int update(@NonNull Uri uri, @Nullable ContentValues contentValues, @Nullable String s, @Nullable String[] strings) {
        int count = 0;
        switch (uriMatcher.match(uri)) {
            case PERSONS:
                count = database.update(DatabaseHelper.TABLE_NAME, contentValues, s, strings);
                break;
            default:
                throw new IllegalArgumentException("알 수 없는 URI " + uri);
        }
        getContext().getContentResolver().notifyChange(uri, null);

        return count;
    }
}
update() 메서드 : 내용 제공자를 이용해 값을 수정하고 싶을 때 사용
- 첫 번째 파라미터(uri)
- 두 번째 파라미터(contentValues) : 저장할 칼럼명과 값들이 들어간 ContentValues 객체 (null이면 XXX)
- 세 번째 파라미터(String s) : SQL의 where 절 조건 (null인 경우 where 절이 없는 것과 동일)
- 네 번째 파라미터(String[] selectionsArgs) : 세 번째 파라미터에 값이 있을 경우 그 안에 들어갈 조건 값을 대체하기 위해 사용
- 결과 값 : 영향을 받은 레코드의 개수
    @Override
    public int delete(@NonNull Uri uri, @Nullable String s, @Nullable String[] strings) {
        int count = 0;
        switch (uriMatcher.match(uri)) {
            case PERSONS:
                count = database.delete(DatabaseHelper.TABLE_NAME, s, strings);
                break;
            default:
                throw new IllegalArgumentException("알 수 없는 URI " + uri);
        }
        getContext().getContentResolver().notifyChange(uri, null);

        return count;
    }
delete() 메서드 : 내용 제공자를 이용해 값을 삭제하고 싶을 때 사용
- 첫 번째 파라미터(uri)
- 두 번째 파라미터(String s) : SQL의 where 절 조건 (null인 경우 where 절이 없는 것과 동일)
- 세 번째 파라미터(String[] selectionsArgs) : 두 번째 파라미터에 값이 있을 경우 그 안에 들어갈 조건 값을 대체하기 위해 사용
- 결과 값 : 영향을 받은 레코드의 개수
MainActivity.java
public class MainActivity extends AppCompatActivity {

    TextView textView;
    String uriString = "content://com.june.providertest/person";
    Uri uri = new Uri.Builder().build().parse(uriString);

    @Override
    protected void onCreate(Bundle savedInstanceState) {
        super.onCreate(savedInstanceState);
        setContentView(R.layout.activity_main);

        textView = findViewById(R.id.textview_result);

        Button InsertBtn = findViewById(R.id.btn_insert);
        InsertBtn.setOnClickListener(new View.OnClickListener() {
            @Override
            public void onClick(View view) {
                insertPerson(uri);
            }
        });

        Button QueryBtn = findViewById(R.id.btn_query);
        QueryBtn.setOnClickListener(new View.OnClickListener() {
            @Override
            public void onClick(View view) {
                queryPerson(uri);
            }
        });

        Button UpdateBtn = findViewById(R.id.btn_update);
        UpdateBtn.setOnClickListener(new View.OnClickListener() {
            @Override
            public void onClick(View view) {
                updatePerson(uri);
            }
        });

        Button DeleteBtn = findViewById(R.id.btn_delete);
        DeleteBtn.setOnClickListener(new View.OnClickListener() {
            @Override
            public void onClick(View view) {
                deletePerson(uri);
            }
        });
    }

    public void printText(String text) {
        textView.append(text+"\n");
}- 사용할 Uri 문자열은 Uri 클래스의 parse() 메소드를 이용하여 Uri 객체로 변환하여 사용
- 변환한 Uri 객체를 매개변수로 하는 생성, 조회, 수정, 삭제 버튼의 기능 메소드를 만듦
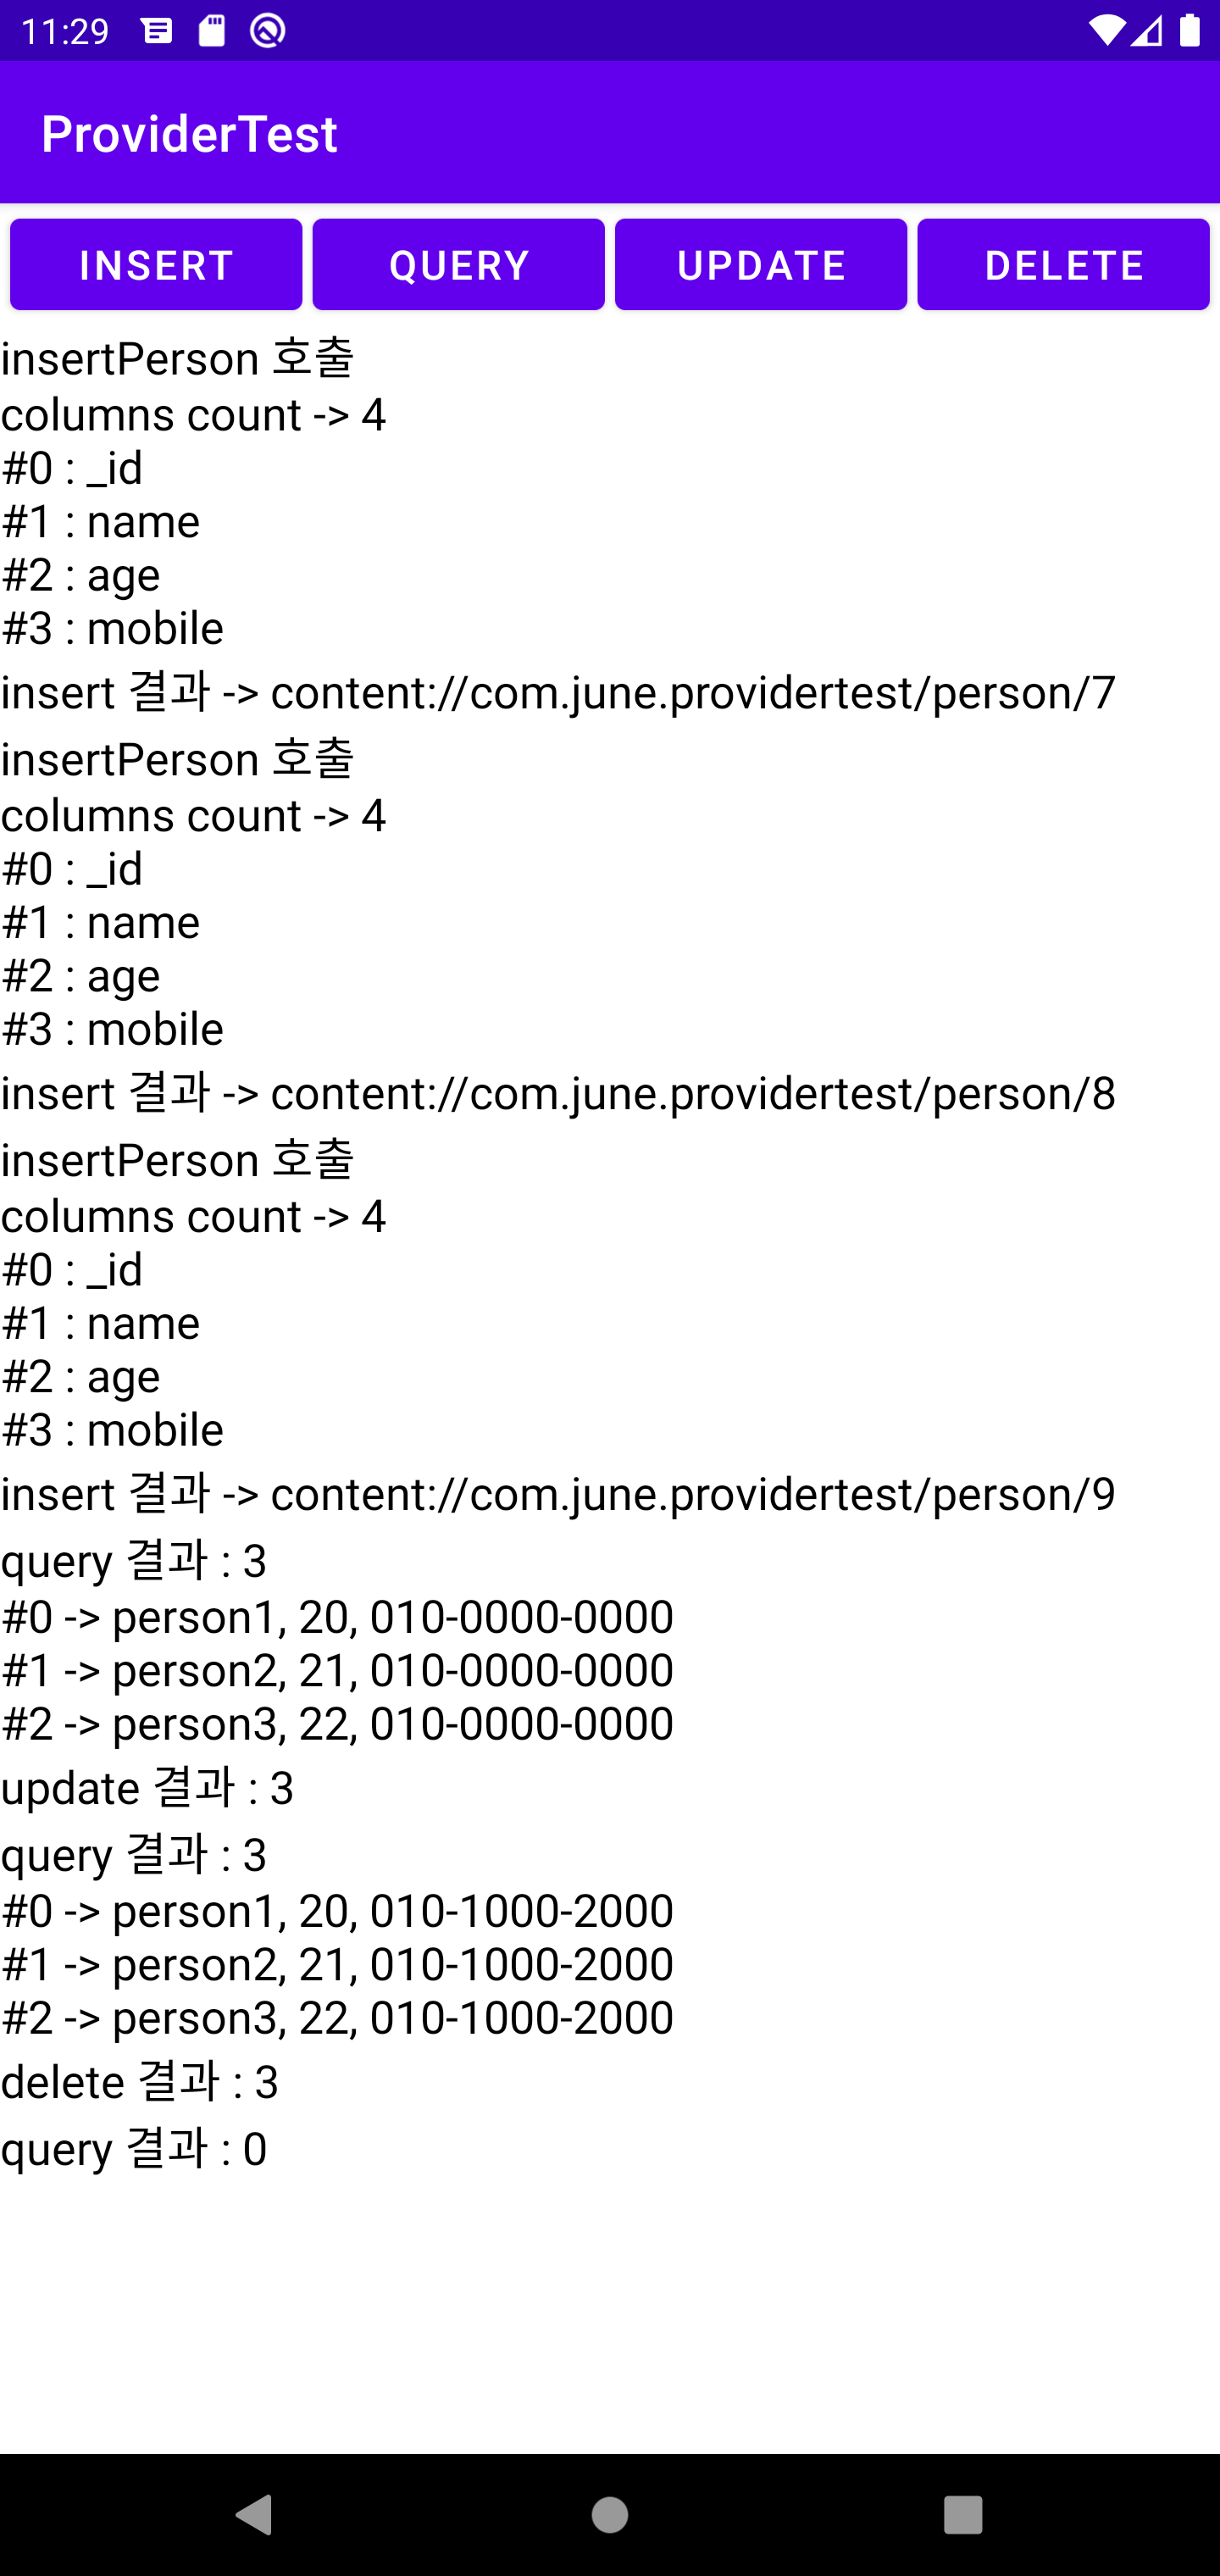
    public void insertPerson(Uri uri) {
        printText("insertPerson 호출");

        Cursor cursor = getContentResolver().query(uri, null, null, null, null,  null);
        String[] columns = cursor.getColumnNames();
        printText("columns count -> " + columns.length);

        for (int i = 0; i < columns.length; i++) {
            printText("#" + i + " : " + columns[i]);
        }

        ContentValues values = new ContentValues();
        values.put("name", "person"+ Integer.toString(cursor.getCount()+1));
        values.put("age", cursor.getCount()+20);
        values.put("mobile", "010-0000-0000");

        uri = getContentResolver().insert(uri, values);  // 삽입 후 새로운 URI 반환
        printText("insert 결과 -> " + uri.toString());
}- ContentResolver 객체의 query() 메소드를 호출하여 Uri 객체를 파라미터로 정의하고 Cursor 객체를 반환 받음
- Cursor 객체의 getColumnNames() 메소드를 이용하여 컬럼들의 이름을 조회함
- ContentValues 객체로 새로 생성할 레코드를 만들어줌 (Cursor를 이용하여 현재 레코드의 개수에 1과 20을 더해 새로운 레코드를 생성함)
- ContentResolver 객체의 insert() 메소드를 이용하여 레코드를 추가하고 새로운 Uri 객체를 반환받음
    public void queryPerson(Uri uri) {
        try {
            String[] columns = new String[] {"name", "age", "mobile"};
            Cursor cursor = getContentResolver().query(uri, columns, null, null, "name ASC");
            printText("query 결과 : " + cursor.getCount());

            int index = 0;
            while(cursor.moveToNext()) {
                String name = cursor.getString(cursor.getColumnIndex(columns[0]));
                int age = cursor.getInt(cursor.getColumnIndex(columns[1]));
                String mobile = cursor.getString(cursor.getColumnIndex(columns[2]));

                printText("#" + index + " -> " + name + ", " + age + ", " + mobile);
                index += 1;
            }
        } catch (Exception e) {
            e.printStackTrace();
        }
}- Cursor 객체의 getColumnIndex() 메서드를 이용하여 조회할 칼럼의 이름을 매개변수로 전달하고 지정 칼럼의 값을 반환받음
- while문에서 cursor.moveToNext() 메서드를 이용하여 다음 레코드로 커서를 넘겨줌
    public void updatePerson(Uri uri) {
        String selection = "mobile = ?";
        String[] selectionArgs = new String[] {"010-0000-0000"};
        ContentValues updateValue = new ContentValues();
        updateValue.put("mobile", "010-1000-2000");
        int count = getContentResolver().update(uri, updateValue, selection, selectionArgs);

        printText("update 결과 : " + count);
}- ContentResolver의 update() 메서드를 이용하여 호출하면서 Uri 객체, ContentValues 객체, where 조건, where 조건의 ? 기호를 대체할 값을 차례로 넣음
    public void deletePerson(Uri uri) {
        String selection = "age >= 20";
        int count = getContentResolver().delete(uri, selection, null);
        printText("delete 결과 : " + count);
     }
}- ContentResolver의 delete() 메서드를 사용해서 원하는 데이터를 삭제할 수 있음
- 해당 예제에서는 age 컬럼 값이 20 이상인 경우 모두 삭제해 주었고, 삭제된 레코드의 개수를 표시해주었음
AndroidManifest.xml
<?xml version="1.0" encoding="utf-8"?>
<manifest xmlns:android="http://schemas.android.com/apk/res/android"
    package="com.june.providertest">

    <permission android:name="com.june.providertest.READ_DATABASE" android:protectionLevel="normal"/>
    <permission android:name="com.june.providertest.WRITE_DATABASE" android:protectionLevel="normal"/>

    <application
        ...>
        <provider
            android:authorities="com.june.providertest"
            android:name=".PersonProvider"
            android:exported="true"
            android:readPermission="com.june.provider.READ_DATABASE"
            android:writePermission="com.june.provider.WRITE_DATABASE"/>
        ...
    </application>
</manifest>- <permission> : 권한을 새로 정의할 때 사용하는 태그
- .READ_DATABASE, .WRITE_DATABASE
- protectionaLevel 속성
- <provider>
- authorities 속성 : 내용 제공자를 정의할 때 설정한 authorities 값과 동일하게 설정
- name 속성 : 내용 제공자 클래스로 설정한 클래스 명으로 설정
- readPermission 속성 : .READ_DATABASE 권한으로 설정
- writePermission 속성 : .WRITE_DATABASE 권한으로 설정
*DatabaseHelper 클래스와 MIME TYPE에 대한 자세한 내용은 아래 포스팅 참고!
[Android] 모바일 데이터베이스(Database)와 테이블(Table) 생성
모든 내용은 Do it! 안드로이드 앱 프로그래밍을 바탕으로 정리한 것입니다. 모바일 데이터베이스 많은 양의 데이터를 체계적으로 관리하기 위해서 사용 (↔ SharedPreferences는 데이터를 간단하게
junyoung-developer.tistory.com
[Android] 인텐트(Intent)
모든 내용은 Do it! 안드로이드 앱 프로그래밍을 바탕으로 정리한 것입니다. 인텐트(Intent) 앞에서 본 인텐트는 작업을 수행하기 위해 사용되는 명령 or 데이터를 전달하는 기능 → 인텐트를 만든
junyoung-developer.tistory.com